Showing posts with label Blogger Widget. Show all posts

5 Rotating Add Banner Javascript

Rotating Add Banner Javascript is here for you friends where you can use javascript to show various add banners on same space by rotating it in timely banner. It will be very helpful for those who sometimes feel short of space to show there advertisers.

0 Drop Down Menu For Blogger

Drop Down Menu For Blogger as everybody would like it in the blog. Just choose an option and click the menu you like , new window will open with the option selected. Below is the demo of it.


Now how to make this drop down menu.

Just GO To ,

LAYOUT > ADD PAGE ELEMENT > HTML /JAVASCRIPT

Add the below codes to it and Save It.


<form><select name="menu" onchange="window.open(this.options[this.selectedIndex].value,'_blank')"
size=1 name=menu>

<option>- Your Title - </option>

<!-- change the links with your own -->

<option value="http://yourlink.com">Title One</option>

<option value="http://yourlink.com">Title second</option>

<option value="http://yourlink.com">Title Third</option>

<option value="http://anshuldudeja.blogspot.com">blogger widget</option>

</select></form>


* Change the links and text in red according to your blog menu.

You can increase the options in codes to increase your drop down menu links.

Width of drop down menu depends on the length of the titles you using in them.

Bye friends see you tomorrow with my new post babai.

5 Statistics Widget For Blogger

Statistics widget that shows all the statistics counting total no of posts and comments in your blog.The credits of this widget goes to Assess My Blog.


Now How to add this widget to you Blog. Follow the instructions

Go to dashboard of your blogger > Layout > Add a Gadget > HTML/JAVASCRIPT

Add the below codes to it-


<script style="text/javascript">

function numberOfPosts(json) {
document.write('Total Posts: <b>' json.feed.openSearch$totalResults.$t '</b><br>');
}

function numberOfComments(json) {
document.write('Total Comments: <b>' json.feed.openSearch$totalResults.$t '</b><br>');
}

</script>

<ul><li><script src="http://yourblog.blogspot.com/feeds/posts/default?alt=json-in-script&callback=numberOfPosts"></script></li>

<li><script src="http://yourblog.blogspot.com/feeds/comments/default?alt=json-in-script&callback=numberOfComments"></script></li></ul>

<noscript><a href="http://www.anshuldudeja.com" target="_blank">Blogger Hacks</a></noscript>


Now Just change the code in red to your blog name or your domain name to display of your total no of posts and comments.

And now save it. Its Done enjoy using this. senyum

2 Star Rating widget For Blogger Posts

Star Rating widget For Blogger Posts one of the beautiful widget to rate the post. Now its very easy to add star rating widget below each blogger posts.

If you wanna add star rating widget like below to your blog, Just login to your blogger with draft.blogger.com instead of blogger.com.


Now Follow this path:-


LAYOUT > Page Elements > Edit Post Box > Select There Rating Widget > SAVE


Now View your Blog , you will see the rating widget below every post.


This will only work if you are using uncustomized blogger template by google.


If you are using customized template or third party template on blogger. Then add these few codes to your blogger html.

Layout > Edit Html > Ctrl + F

Now,
Search For <data:post.body />


Add below codes Just after this green line


<b:if cond='data:blog.pageType == &quot;item&quot;'>
<span class='star-ratings'>
<b:if cond='data:top.showStars'>
<div expr:g:background-color='data:backgroundColor' expr:g:text-color='data:textColor' expr:g:url='data:post.absoluteUrl' g:height='42' g:type='RatingPanel' g:width='180'/>
</b:if>
</span>
</b:if>


Now Find This Line <b:include name='nextprev'/>


Add Below codes just after it


<b:if cond='data:top.showStars'>
<script src='http://www.google.com/jsapi' type='text/javascript'/>
<script type='text/javascript'>
google.load("annotations", "1");
function initialize() {
google.annotations.createAll();
google.annotations.fetch();
}
google.setOnLoadCallback(initialize);
</script>
</b:if>


Now Save Your Template. Its Done View Your Blog.

A Beautiful Post Rating widget is now added below your each post of blogger.

0 Recent Posts Widget For Blogger

More then 5 Recent Posts Widget For Blogger. As recent posts can easily be added via feedburner or google.

How to add 5 recent posts.

Click LAYOUT > ADD A GADGET > FEED

Then type your feed url and save it will show upto your 5 recent posts.

How to add more than 5 Recent Posts Widget For Blogger.

Click LAYOUT > ADD A GADGET > HTML/JAVASCRIPT

Now add the code from below to it and save it.


<script src="http://bandofgirls.googlepages.com/recent-posts.js"></script>

<script>

var numposts = 12;

var showpostdate = false;

var showpostsummary = false;

var numchars = 100;

</script>

<h2>RECENT POSTS</h2>

<script src="http://yourblogname.blogspot.com/feeds/posts/default?orderby=published&alt=json-in-script&callback=rp"></script>
<noscript><a href="http://www.anshuldudeja.com" target="_blank">Blogger Hacks</a></noscript>


Change the codes in red to your blog name and no of posts to be shown and its length of characters.

It will show up 12 recent posts like in my blog.

1 Scroll Bar Widget For Blogger

Scroll Bar Widget For Blogger i.e to add a scrolling bar to sidebar of blogger text or labels if list is too long.This scroll bar helpful if you have so many categories or want many posts to be seen in short space.

Lets Make a Scrolling Bar menu for your Blog

First of all sign in your blog and go to Layout section. Now you have to click on Add a Page Element Where you want to add the scrolling bar widget.

Click Image To enlarge


Select HTML JAVASCRIPT to add the page element .

Now You have to add some html codes to his page element to show of the scroll bar menu widget to the sidebar of your blogger.


<div class="widget-content">
<ul style="height:150px;width:150px; overflow:auto; ">

<li><a href="http://www.blogaddress.com">Your Text</a></li>
<li><a href="http://www.blogaddress.com">Your Text</a></li><span style="font-weight:bold;"></span>

</ul></div>


Copy this codes and paste it to page element and save it.

Now preview your blog.

You can change your links and text in the codes to show of yours links and posts.

Note:-In the codes you can edit height and width in red to adjust it to your blog.

2 Page Navigation Widget

Page Navigation hack is now also available in bloggers. As you may be viewing the numbered menu widget below the posts to visit the latest or previous posts. as these widgets are only provided in wordpress blogs or hosted blogs.But now his hack has been made available in bloggers also with the help of Mohammad Rias who always come out with these hacks.

Let us see how to add this Page Navigation Menu Widget :


Login To Your Blogger And Then Click On Settings And Navigate To Layout Section.

Then Click On Add Page Element.


A new Window Will Open in Which Select Add Html/Javascript.
It will ask For Javascript.

Now Copy The Whole Javascript Below And Paste in it.


<style>
.showpageArea a {
text-decoration:underline;
}
.showpageNum a {
text-decoration:none;
border: 1px solid #ccc;
margin:0 3px;
padding:3px;
}
.showpageNum a:hover {
border: 1px solid #ccc;
background-color:#ccc;
}
.showpagePoint {
color:#333;
text-decoration:none;
border: 1px solid #ccc;
background: #ccc;
margin:0 3px;
padding:3px;
}
.showpageOf {
text-decoration:none;
padding:3px;
margin: 0 3px 0 0;
}
.showpage a {
text-decoration:none;
border: 1px solid #ccc;
padding:3px;
}
.showpage a:hover {
text-decoration:none;
}
.showpageNum a:link,.showpage a:link {
text-decoration:none;
color:#333;
}

</style>


<script type="text/javascript">

function showpageCount(json) {
var thisUrl = location.href;
var htmlMap = new Array();
var isFirstPage = thisUrl.substring(thisUrl.length-14,thisUrl.length)==".blogspot.com/";
var isLablePage = thisUrl.indexOf("/search/label/")!=-1;
var isPage = thisUrl.indexOf("/search?updated")!=-1;
var thisLable = isLablePage ? thisUrl.substr(thisUrl.indexOf("/search/label/")+14,thisUrl.length) : "";
thisLable = thisLable.indexOf("?")!=-1 ? thisLable.substr(0,thisLable.indexOf("?")) : thisLable;
var thisNum = 1;
var postNum=1;
var itemCount = 0;
var fFlag = 0;
var eFlag = 0;
var html= '';
var upPageHtml ='';
var downPageHtml ='';


var pageCount=5;
var displayPageNum=3;
var firstPageWord = 'First';
var endPageWord = 'Last';
var upPageWord ='Previous';
var downPageWord ='Next';


var labelHtml = '<span class="showpageNum"><a href="/search/label/'+thisLable+'?&max-results='+pageCount+'">';

for(var i=0, post; post = json.feed.entry[i]; i++) {
var timestamp = post.published.$t.substr(0,10);
var title = post.title.$t;
if(isLablePage){
if(title!=''){
if(post.category){
for(var c=0, post_category; post_category = post.category[c]; c++) {
if(encodeURIComponent(post_category.term)==thisLable){
if(itemCount==0 || (itemCount % pageCount ==(pageCount-1))){
if(thisUrl.indexOf(timestamp)!=-1 ){
thisNum = postNum;
}

postNum++;
htmlMap[htmlMap.length] = '/search/label/'+thisLable+'?updated-max='+timestamp+'T00%3A00%3A00%2B08%3A00&max-results='+pageCount;
}
}
}
}//end if(post.category){

itemCount++;
}

}else{
if(title!=''){
if(itemCount==0 || (itemCount % pageCount ==(pageCount-1))){
if(thisUrl.indexOf(timestamp)!=-1 ){
thisNum = postNum;
}

if(title!='') postNum++;
htmlMap[htmlMap.length] = '/search?updated-max='+timestamp+'T00%3A00%3A00%2B08%3A00&max-results='+pageCount;
}
}
itemCount++;
}
}

for(var p =0;p< htmlMap.length;p++){
if(p>=(thisNum-displayPageNum-1) && p<(thisNum+displayPageNum)){
if(fFlag ==0 && p == thisNum-2){
if(thisNum==2){
if(isLablePage){
upPageHtml = labelHtml + upPageWord +'</a></span>';
}else{
upPageHtml = '<span class="showpage"><a href="/">'+ upPageWord +'</a></span>';
}
}else{
upPageHtml = '<span class="showpage"><a href="'+htmlMap[p]+'">'+ upPageWord +'</a></span>';
}

fFlag++;
}

if(p==(thisNum-1)){
html += '&nbsp;<span class="showpagePoint"><u>'+thisNum+'</u></span>';
}else{
if(p==0){
if(isLablePage){
html = labelHtml+'1</a></span>';
}else{
html += '<span class="showpageNum"><a href="/">1</a></span>';
}
}else{
html += '<span class="showpageNum"><a href="'+htmlMap[p]+'">'+ (p+1) +' </a></span>';
}
}

if(eFlag ==0 && p == thisNum){
downPageHtml = '<span class="showpage"> <a href="'+htmlMap[p]+'">'+ downPageWord +'</a></span>';
eFlag++;
}
}//end if(p>=(thisNum-displayPageNum-1) && p<(thisNum+displayPageNum)){
}//end for(var p =0;p< htmlMap.length;p++){

if(thisNum>1){
if(!isLablePage){
html = '<span class="showpage"><a href="/">'+ firstPageWord +' </a></span>'+upPageHtml+' '+html +' ';
}else{
html = ''+labelHtml + firstPageWord +' </a></span>'+upPageHtml+' '+html +' ';
}
}

html = '<div class="showpageArea"><span style="padding: 2px 4px 2px 4px;margin: 2px 2px 2px 2px;border: 1px solid #333; background-" class="showpage">Page '+thisNum+' of '+(postNum-1)+': </span>'+html;

if(thisNum<(postNum-1)){
html += downPageHtml;
html += '<span class="showpage"><a href="'+htmlMap[htmlMap.length-1]+'"> '+endPageWord+'</a></span>';
}

if(postNum==1) postNum++;
html += '</div>';

if(isPage || isFirstPage || isLablePage){
var pageArea = document.getElementsByName("pageArea");
var blogPager = document.getElementById("blog-pager");

if(postNum <= 2){
html ='';
}

for(var p =0;p< pageArea.length;p++){
pageArea[p].innerHTML = html;
}

if(pageArea&&pageArea.length>0){
html ='';
}

if(blogPager){
blogPager.innerHTML = html;
}
}

}
</script>

<script src="/feeds/posts/summary?alt=json-in-script&callback=showpageCount&max-results=99999" type="text/javascript"></script>
<div style="text-align:right;font-size:10px;color:000000;margin-top:15px;display:none;"> <a href="http://www.anshuldudeja.com">Grab this Widget ~ World Of Blogging</a></div>


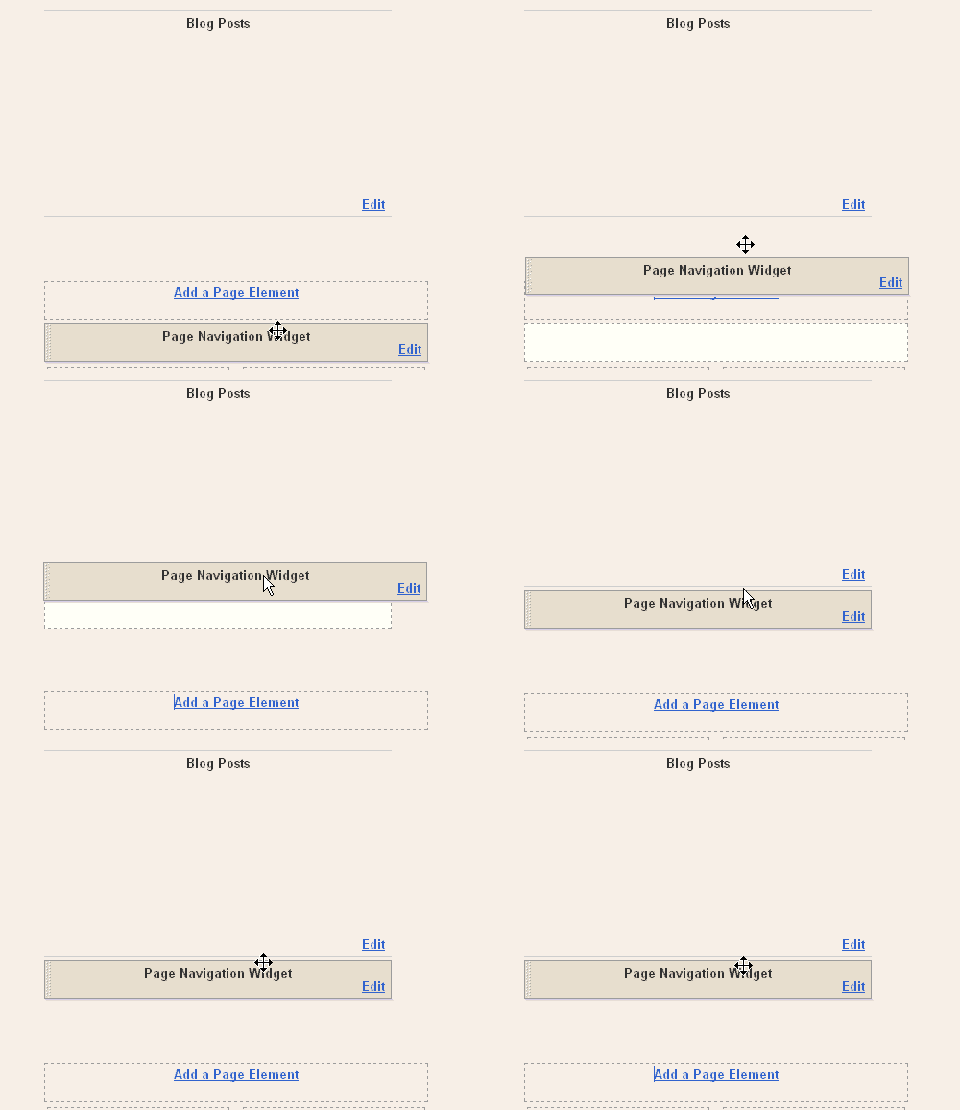
After Adding this Javascript you need to drag and drop the widget below the Blog Posts main widget. See this screen shot

Page Navigation Menu Widget

In the above code you can find the below written word and can change its value from 5 to any you want.

1 : var pageCount = 5;

*where 5 is the the number of post that apppear in another page you will visit.

In my Blog It is set as 5.